An evolution in orthodontic retention
Dr Thomas Sealey discusses how he combined an invisible fixed-lingual retainer with a removable acrylic retainer to develop the world’s only invisible dual-retention system
My focus of practice is cosmetic dentistry, using minimally invasive solutions for full-smile rehabilitations. I have been very impressed with how cosmetic tooth alignment systems can transform someone’s smile in a relatively short space of time and that, when combined with composite bonding techniques, we have been offered the tools to achieve a true minimally invasive smile makeover.
This movement towards cosmetically focused treatment has encouraged me to develop my orthodontic practice and improve my composite bonding artistry. In the last few years, I have really focused on achieving high-end results, with completely invisible solutions where possible. I strive to create the ideal smile transformations that my patients request, without the need to drill and damage the teeth. This has driven my self-education towards new materials and techniques, which can achieve the desired results – making improvements on the more traditional and historical dentistry.
A key issue that challenges my clinical ethos has always been that, after months of orthodontics, the patient was left with only the choice of a fixed-wire retainer or a removable clear acrylic retainer. Both options have long been accepted as the standard after tooth realignment, but I have always had concerns. I have found that most of my patients who visit me for orthodontic corrections are those who already had braces when they were younger and failed to consistently wear their retainer, therefore their teeth drifted and their smile was detrimentally affected.
I also find it counter-intuitive to place a metal wire retainer onto teeth after spending so much time instilling the virtues of invisible tooth alignment, with both fixed and removable orthodontic solutions. It seemed nonsensical to be promoting ‘invisible’ and ‘metal-free’ dentistry only to place a wire onto teeth, especially when it is very visible on the lingual surface of the lower teeth when the patient smiles and talks.
This led me to explore the various fibre retainers available. There was an array of different materials that all contained some form of glass fibre, impregnated within an uncured and unfilled methacrylate resin. What all these material had in common was their incredibly difficult and technique-sensitive application. With respect to preparation for bonding of the lower teeth, one is bombarded with patient challenges that complicate this procedure. The uncontrollable tongue, the sub-lingual saliva fountain, the inability to stop rapidly swallowing; it is always very difficult to apply these fibres on a tooth-by-tooth basis without any moisture contamination. Plus, after fibre application, one must place a second additional layer of composite to cover the whole fibre and to seal it. This second procedure, again, is incredibly challenging to quickly and effectively execute before the inevitable ‘patient factor’ ruins everything.
If you are successful, and manage to place a fibre-reinforced composite (FRC) retainer well, then it will outlast wire retainers. There is an abundance of evidence within the dental literature supporting the use of FRC retainers for post-orthodontic retention and their superior longevity. However, if something went wrong mid-placement, then the whole process is ruined. I have placed many of these FRC retainers and love the patient tolerance and invisible aesthetics, but hate the long appointment time necessary and the difficult placement technique.
It dawned on me that there must be a simpler way.
-
- Fig 1
-
- Fig 2
-
- Fig 3
-
- Fig 4
-
- Fig 5
-
- Fig 6
After prototyping my idea on models cast from an impression of my own teeth, I finally perfected the design. The premise was to achieve a simple way to place a FRC retainer in a single, one-stage technique, which removed all of the technical difficulties that one usually faces with this type of retainer. Once I had established a technique that worked consistently with reproducible accuracy, I evolved my idea further to develop an impression technique and final product that also allows one to place the retainer while the fixed labial orthodontic brackets are still present on the teeth. I applied for a patent of the ‘Sealey Retainer’ and very shortly after this, Cfast Orthodontic Solutions began distributing the retainer as the SOLID Retention System. The SOLID Retention System stands for Single-visit Orthodontic Lingual and Invisible Dual Retention System, although understandably it has come to be known as the SOLID Retainer.
The whole retention system differs from any other available on the market as it is the only invisible FRC retainer which is fully stent-guided for placement, with which the stent-retainer then actually becomes a perfectly fitting Essix-style retainer. The SOLID retainer is delivered in a metal retainer tin and comes with a compule of composite, which is needed for its application and adhesion to the teeth. You receive the SOLID Retainer in a sealed pouch with a second ‘try-in’ retainer. The ‘try-in’ retainer is also made as an exact copy of the stent-retainer and, therefore, acts as the patient’s second removable retainer.
And so, you have both types of retention – invisible-fixed and two removable retainers – from one product and from only one impression. As you can take the impression while the brackets are still on the teeth, you can be assured of no tooth movement before you fit the retainer. This is performed at the same visit as the bracket debond and, therefore, you save both chair-time and laboratory fees. The patient leaves with an invisible-fixed solution and two removable retainers to keep them in correct alignment for many years to come.
The following case study demonstrates nicely the stages for placement of the retainer and the aesthetic results that can be achieved. This case study shows that the retainer can be used for many applications, whether the patient is wearing fixed or removable orthodontics, or whether they have metal-allergies and when aesthetics are a priority to them.
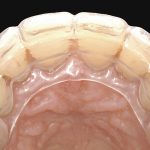
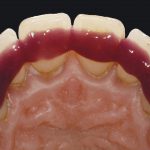
This patient presented from another practice with a debonded upper palatal wire retainer. She had removed some of the loose wire herself and it was debonded from the central incisors (Fig 1). The teeth had begun to drift and the wire was visible through the midline diastema (Fig 2).
All that was necessary at this stage was a PVS (Poly-vinyl siloxane) impression. This was sent to Cfast and an upper SOLID was requested. Cfast can turn a SOLID around in a week and quicker if pre-arranged. If you have an intra-oral scanner, then you can take a digital impression instead.
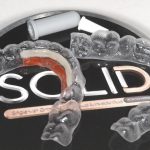
After one week, we received the retainer tin that includes the sealed SOLID Retainer, a ‘try-in’ retainer and a compule of composite. Figure 3 shows what is included but the sealed pouch has been omitted for illustration purposes.
Once the patient returned, the wire retainer and the old composite were removed from the palatal aspects of her upper teeth. At this stage, I placed the ‘try-in’ retainer to confirm a perfect fit (Fig 4). Although very rare, there is always the chance for an anomaly within the impression supplied by the clinician to be transferred along the manufacturing chain, which can result in an ill-fitting retainer. The purpose of the ‘try-in’ prevents the clinician from continuing further if there is a fitting problem with the retainer. If this were to occur, the clinician can still place the SOLID and we have full instructions on how to utilise the ‘try-in’ retainer, which is available on the Cfast website.
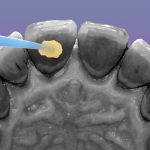
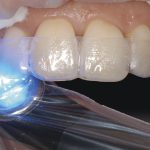
As the ‘try-in’ was a perfect fit, one can confidently prepare the teeth, knowing that the final SOLID Retainer will also be a perfect fit. To prepare the teeth, I air-abraded the palatal aspects with 27 micron aluminium oxide to remove any pellicle. The teeth were then etched for 30 seconds using phosphoric acid 35 per cent, being careful to keep the etch to the middle third of the palatal surfaces (Fig 5).
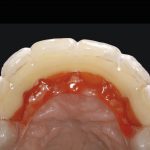
The teeth were bonded following enamel bonding protocol. Again, care was taken to keep the bond away from the gingival margins and the incisal edges (Fig 6). Up to this stage, all the preparation procedures are the same as for when bonding a wire retainer.
-

- Fig 7
-
- Fig 8
-
- Fig 9
-
- Fig 10
-
- Fig 11
-
- Fig 12
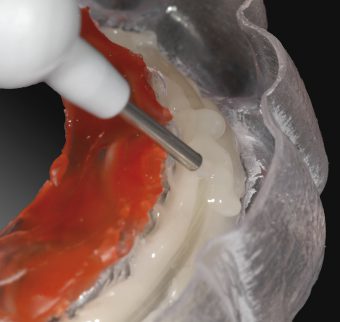
While my dental assistant cured the adhesive bond, I activated the fibre-part of the SOLID Retainer with the enclosed composite compule. A layer of composite flow is placed over the entire retainer FRC length. This will create the interface that bonds the FRC retainer to the palatal surfaces of the teeth. You will see from the close-up photos (Fig 7) that the retainer fibre is embedded into composite resin. All these materials have been specifically chosen for their elastic properties and flexural strength, which makes them well suited for the application as a retainer. As a side note, most of the FRC retainers that failed historically were due to the composite covering layer being made from a material that was too rigid and, therefore, couldn’t compensate for normal physiological tooth micro-movements. With current material technology, I was able to choose materials that met the exact mechanical properties needed for application in this specific situation.
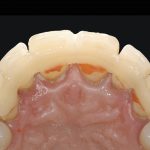
The SOLID Retainer is then placed over the teeth and secured into position with finger pressure (Fig 8). The red block-out wax fills into all of the embrasures and around the cervical margins of the teeth to prevent the composite from flowing into these areas – this means that the FRC retainer stays exactly where it is supposed to. While the dentist secures the retainer in position, the dental assistant will cure along the length of the retainer for 30 seconds (Fig 9).
The acrylic stent retainer can then be removed and the FRC retainer assessed for its full and complete placement (Fig 10). Any voids in the composite can be filled at this stage before a final 30-second cure. Best practice would be to place a gel over the retainer to allow full curing of the oxygen-inhibited layer of the composite.
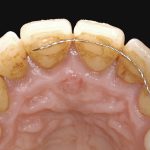
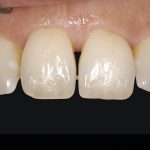
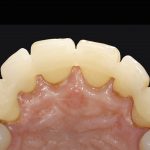
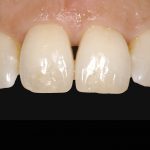
The retainer can then be polished and the edges smoothed where necessary. Any composite flash that may have extended over the incisal edges is removed with a scaler, as there was no bond placed and, therefore, it does not adhere to the tooth. The final retainer is virtually invisible and incredibly smooth (Fig 11). The patient can easily clean through the embrasures with interproximal brushes. You will see from the final picture (Fig 12) that simply removing the wire retainer and applying the FRC retainer has closed the midline diastema and improved the aesthetics.
Finally, the patient is given both the ‘try-in’ retainer and the stent retainer, which now become their removable Essix-style retainers to be worn every night.
I save 10 minutes chair-time placing a SOLID Retainer when compared to placing a fixed-wire retainer. I also save one full appointment per patient by both removing the brackets, fitting the FRC retainer, and giving the patients the removable retainers to take home. Historically, one would have to fit the wire retainer and debond, take an impression and then recall the patient for an additional appointment. In addition, I am also able to charge more for the SOLID Retention System due to its invisible aesthetics, smoother feel and additional second removable retainer.
You must be logged in to post a comment.