Treatment of severe wear cases
Professor Paul Tipton describes the diagnostic work that is involved in a full mouth reconstruction at an increased vertical dimension
Prosthodontists are often called upon to reconstruct the occlusion in patients with severe wear. There may be a multitude of issues to address in such cases, including attrition, abrasion, and erosion – all of which contribute to uneven wear and compensatory eruption throughout the arches. There may also be incisal wear and/or interproximal wear and, as a result, the occlusal plane may need levelling and lengthening for enhanced aesthetics and to allow correction and control of the
occlusal relationship.
The aesthetic and functional requirements include a decision of the occlusal scheme to be used followed by determination of the incisal edge positions at rest, the occlusal plane, vertical dimension to work to anterior guidance, lip support etc. All this is achieved by the diagnostic wax-up. This article describes the diagnostic work required for the full mouth reconstruction at an increased vertical dimension.
Treatment planning
All comprehensive treatment planning should begin with an occlusal aesthetic evaluation. Evaluation of the face is essential in determining the ideal aesthetic orientation of the teeth from both a horizontal and vertical perspective. The horizontal reference planes will help the clinician align the occlusal plane and the soft tissue levels along with other related aesthetic determinants. The horizontal reference planes should be evaluated from two perspectives: the frontal and the sagittal.
The frontal perspective is assessed by having the patient look out into the horizon and choosing the ideally leveled plane. The most commonly used horizontal reference planes include inter-pupillary line and inter-commissural line (Figure 1). Intra-oral photographs are also key at this stage (Figures 1 and 2). The following steps are essential to fulfilling the correct diagnosis.
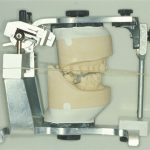
Step 1: Mounted study casts
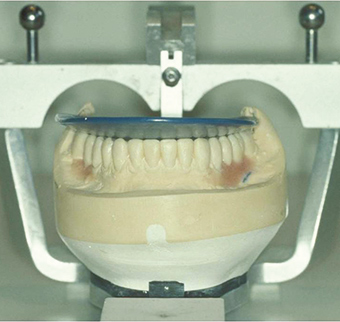
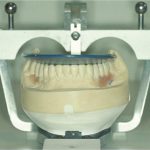
This is achieved by taking accurate alginate impressions of upper and lower jaws in rim-lock trays, facebow recording and jaw registration around RAP. The technician can now mount the study casts in a semi-adjustable articulator (Figure 3).
Step 2: Vertical dimension
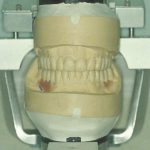
The first treatment planning decision is what vertical dimension to work at. This can be established by the use of a wax squash bite placed into the patient’s mouth. As the patient is manipulated into RAP the lower teeth indent the wax bite. This can be removed, chilled in iced water and replaced as the patient and clinician now assess profile and facial aesthetics. In this way, changes in vertical dimension can be transferred early to the technician on the articulated casts and the initial new occlusal plane assessed via an elastic band (Figure 4). Once mounted, the degree of over-eruption of either arch can be assessed (Figure 5) and casts adjusted (Figure 6).
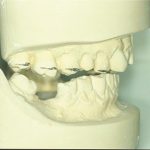
Step 3: Lower incisal edge position
The incisal edge position, incisal plane and occlusal plane are the three most important aesthetic determinants in the development of the treatment plan. These determinants enable the clinician to transfer information throughout the treatment, and are related in specific ways to other aesthetic criteria. The first step in determining the position of the teeth is evaluation of the lower incisal edge position with the lips at rest (Figure 7).
Tooth exposure is considered to be in the 0mm to 3mm range dependent on age. To achieve the correct position, the edges of the lower anterior teeth need to be shortened or lengthened by either removing stone or adding wax. For example, if crown lengthening is indicated on teeth that were previously ideally proportioned, the incisal edge length can be reduced. Establishing the correct amount of lower tooth exposure dependent upon the age of the patient at rest should be the goal. Once the final lower incisal edge position is determined, the lower occlusal plane is evaluated.
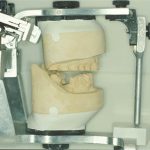
Step 4: Curve of Spee
For this the PMS method is used to establish the anatomically average curves of Spee and Monson, of the radius of a four-inch circle. This is done using a Boyles plane analyser (Figure 8). For this, three reference points are required. One has already been established and that is the position of the lower incisal edge position as per the aesthetic requirements of the patient dependent upon age. The amount of wax added to the lower incisors or amount of stone removed from the lower incisors on the mounted study casts is established by using the lip as the reference plane and calculating where the lower incisal edges are and where they should be. This new level is transferred to the technician so that his starting point for the wax-up is the two lower incisors. The two posterior reference points are the retro-molar pads, which have been shown not to change during life/tooth loss etc. There is a certain amount of flexibility when establishing these two reference points as being half-way and two-thirds of the way up the retro-molar pads.
The lower occlusal plane is established by the Boyles plane analyser resting on the waxed-up or adjusted lower incisors and the two posterior reference points on the retro-molar pads. Any over-erupted teeth are ground down and any teeth not touching are waxed-up to the analyser. This creates the ideal lower occlusal plane.
The lower incisal plane should be levelled to the chosen horizontal reference plane (the inter-commissural line, inter-pupillary line etc), and evaluated from the frontal perspective while the patient is smiling. The next step is to evaluate the occlusal plane from a sagittal view of the patient’s smile.
-
- Fig 1
-
- Fig 2
-
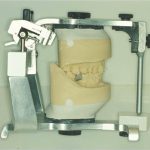
- Fig 3
-
- Fig 4
-
- Fig 5
-
- Fig 6
-
- Fig 7
-
- Fig 8
-
- Fig 9
-
- Fig 10
-
- Fig 11
-
- Fig 12
-
- Fig 13
-
- Fig 14
Step 5: Upper incisal edge position
Next, the upper incisal edge position should be established. This is done by aesthetics and phonetics, especially the F and V sounds to establish the labio-lingual position. Aesthetically, the incisal edge position is evaluated in relationship to the upper lip at rest. Age is again used as a guide, and it is common that the range of incisal edge show may be between ımm and 5mm. The horizontal anterior planes, inter-pupillary line and inter-commissural lines are again used to establish the
correct positions.
The midline position of the upper incisors can be taken from several anatomical landmarks such as the facial midline, nasal midline, lip midline etc. Studies suggest the closest anatomical landmark is the most important – i.e. the midline of the upper lip. Technicians and clinicians should also realise the extent to which they can change midlines without reverting to root canal therapy – approximately ı.5mm to 2mm depending upon the size of the teeth. However, special tooth preparation techniques (beveling the interproximal margin one side) are required to allow for this change. Even then soft tissue problems may occur as the gingival zeniths will move.
Step 6: Establishing anterior guidance
Any space between the lower incisal edges and the palatal aspects of the upper anterior teeth is now closed by waxing the palatal aspects of the upper palatal aspect down to contact the lower incisal edges to gain an incisal and canine stop in the intercuspal positions. Adequate anterior guidance is a complex function directly related to the form of the teeth, and thus to the vertical and horizontal overlap of the incisors and canines.
Anterior guidance is influenced by the proprioception of those teeth, which provides feedback to the masticatory muscles and influences the entire masticatory system. Unlike the posterior determinants, such as the slope of the articular eminence, the vertical and horizontal overlap of the anterior teeth are – to variable degrees – amenable to modification. However, any modifications of the anterior teeth must satisfy not only the aesthetics and phonetics, but also the overall function. If the disclusive angle is too steep, temporomandibular joint or muscular discomfort may result.
Step 7: Maxillary occlusal surfaces
Once the mandibular teeth are ideal in shape and form, wax is added to the maxillary posterior occlusal surfaces to occlude against the mandibular occlusal surfaces in the correct relationship. Correct occlusal shape and form and ridge and groove direction, depth of fossae and height of cusps are now established at the set vertical dimension dependent upon the choice of articulator, facebow and articulator setting devise; checkbite, cadrax, pantograph (Figure 9).
Step 8: Refine the occlusion
The occlusal surfaces can be corrected to perfect the occlusal relationship and to idealise the aesthetic contours by the further addition or subtraction of wax. The final contours of the central incisors should be determined first, followed by the lateral incisors and canines, since the symmetry of these teeth is not as critical as the central incisors.
Step 9: Restoration
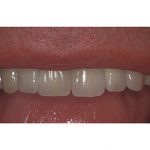
The final restorations can be seen in Figure ı0. The step-by-step procedures in the restoration will be discussed during the following case study.
Case study
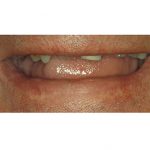
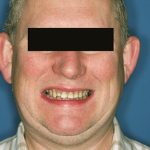
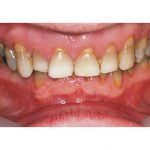
Mr O was referred to me from Birmingham for a full mouth reconstruction (Figures 11, 12). On examination, there was marked amounts of wear present and loss of vertical dimension. Mounted study casts were taken and the vertical dimension – to which the final restorations were to be fabricated – assessed as per the previous discussion. The diagnostics and treatment planning protocols discussed in this paper were used to establish the ideal aesthetic and functional end result, so that the diagnostic waxing, prep guides and prototypes were produced.
Reconstruction then followed along established guidelines of initially an occlusion splint to establish the correct RAP prior to starting tooth preparation procedures. All teeth were initially prototyped, starting with upper and lower anteriors, then one side followed by another side three visits in one week.
Once the prototypes had been in place for a period of time to establish the correct occlusion, function and aesthetics and the patient was comfortable, sections of prototypes were removed, definitive preps, impressions, occlusal records and facebow were taken and final restorations fabricated and fitted. Again, upper and lower anterior crowns were fabricated and fitted first to establish and copy (via a custom-made incisal guidance table) the established anterior guidance. This was followed by one side then another.
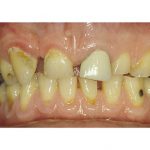
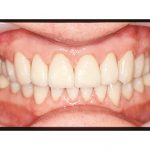
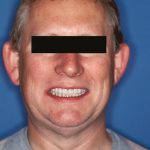
The final result can be seen in Figures 13 and 14. Finally, a post-restorative splint was made for night-time use.
About the author
Professor Paul Tipton is professor of restorative and cosmetic dentistry at the City of London Dental School and a highly respected specialist in prosthodontics.
He has published more than 100 scientific articles in the dental press on aspects of restorative and cosmetic dentistry and is clinical director at Tipton Training Ltd with academies in Manchester, London, Dublin and Dubai.
After gaining his master’s degree in conservative dentistry in 1989, he was awarded the diploma in general dental practice by the Royal College of Surgeons four years later and received specialist status in prosthodontics in 1999 from the GDC.
An ex-professional cricketer with Lancashire County Cricket Club, he is an ex-president of the British Academy of Implant Dentistry (BAID) currently the President of the British Academy of Restorative Dentistry (BARD).
He takes referrals for advanced restorative dentistry, implant prosthodontics and cosmetic dentistry from the T Clinic in Manchester, London and Dublin.
Professor Tipton is also hosting his restorative courses at the T Clinic in Dublin, to find out more, call +353 1 414 0936 or email info@dentalclinic.co
You must be logged in to post a comment.